Automated Verification of Gerber to GDSII
August 4, 2015
Steve DiBartolomeo
Applications Manager
Artwork Conversion Software, Inc.
Introduction
A customer of Artwork uses our GBR2OASISFRAC (with the GBRUnion engine) to convert large complex Gerber files into the GDSII layout format needed to control their mask writer.

Figure 1: the GBR2OAFRAC program is used to convert from Gerber to the GDSII format supported by the image writer.
Some of the Gerber files that are submitted by our customer's customers are extremely complex and make use of very non-standard constructions – thousands of internal layers, thousands of macros and tiny arcs are only a few of these unusual Gerber behaviors.
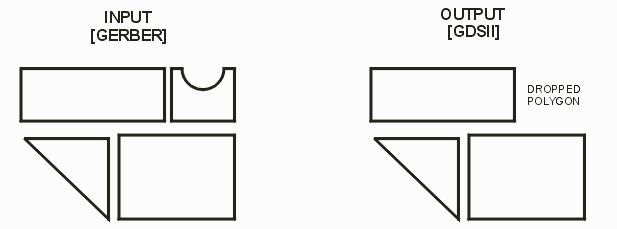
During the Boolean operations to generate GDSII it is possible to occasionally generate a poorly constructed polygon or even to drop a polygon unexpectedly. Even though the number of “bad” polygons is a tiny percent of the data produced, a single missing polygon can cause an expensive mask to be junked.

Figure 2: some unusual or poorly constructed Gerber geometries might be dropped or distorted during processing. (The polygon we show as dropped is only for illustrative purposes.)
Verification?
Therefore our customer would like a way to “verify” the conversion from Gerber to GDSII. Because the end user must convert and check hundreds of layers per day, it is important that this comparison be automated and that results be presented in a way that provides useful summary information.
Raster Verification
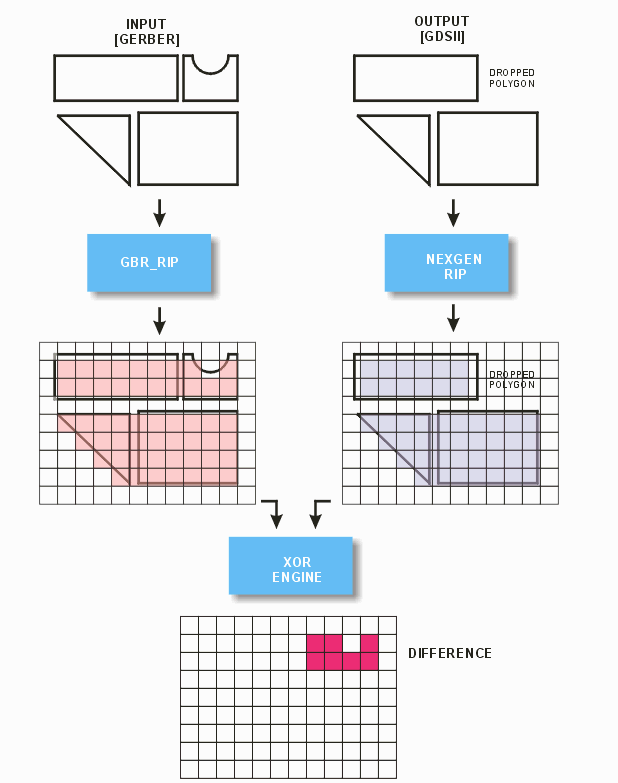
A rasterizer – and in particular Artwork's gbr_rip -- is much more resistant to strange and unusual Gerber input than a Boolean operation. Therefore a way to validate the Gerber to GDSII conversion is to rasterize both files and then to compare the bitmaps. Here is our proposed flow:

Figure 3: Both input and output are rasterized. The resulting bitmaps are compared using an XOR engine; any output pixels are “filtered” to eliminate noise and if anything passes the filter then there is a discrepancy between input and output.
Approach to Full Automation
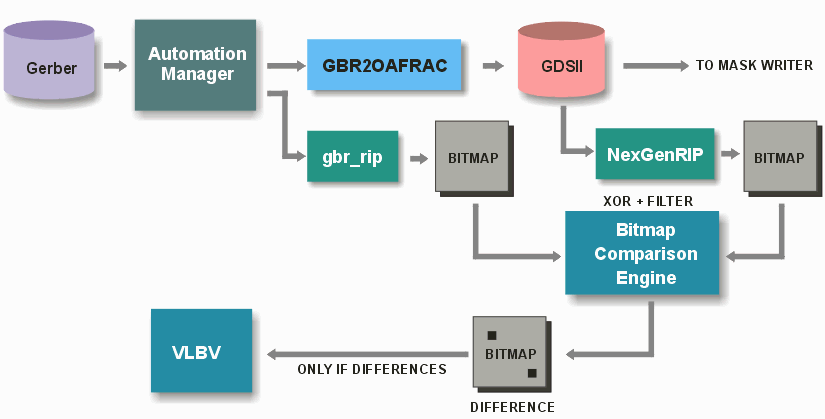
Rather than rely on a complicated script to run the conversion, rasterize each file and then launch a comparison engine, Artwork offers a compiled manager program that will handle all these operations with minimal user intervention.

Figure 4:Fully automated flow controlled by Automation Manager.
The only inputs that the user needs to enter is the name of the file to convert. Every other setting (assuming they do not change from run to run) is remembered by the Automation Manager.
The manager runs the conversion from Gerber to GDII, then launches gbr_rip and Nexgen RIP to rasterizes both files; calls a bitmap comparison engine with the ability to auto-align the two images, performs the comparison and filters any “noise”.
If there are no differences in the output bitmap, the manager notifies the user who can then send the GDSII data to the mask writer.
If there are differences, the manager will launch the VLBV program, load the image and provide to VLBV the list of locations. The user can then inspect the difference file to determine whether the conversion has failed and must be re-run.
Bitmap Comparison Engine
This engine will be able to load two very large bitmaps and perform an auto-alignment. Then it will run the XOR operation. The results of the XOR are filtered using a user specified pixel size (typically 1-3 pixels) and any resulting data is output to a difference bitmap.
For a correct conversion this output bitmap should be empty.
If there are still “pixels” in the difference bitmap resulting from the XOR, the comparison engine will produce a list of coordinates where pixels or blobs of pixels are located. The difference bitmap and the list will be loaded into VLBV automatically, and a user can easily navigate from location to location (with auto-zoom) to inspect these potential problem areas.
Auto Alignment
This is a challenging aspect to the full automation flow since the other steps have were realized in existing modules long ago. We are talking about two very large bitmaps: 80K x 80K pixels. Fortunately we know a priori that the two files are almost identical in size and are very close to being perfectly aligned. Therefore we pick a number of very small regions of the image and apply shifts of one pixel increments until we achieve alignment.